Pages

Wednesday, September 1, 2010

Open Suse 11.3 has been released

The openSUSE Project is pleased to announce the release of the latest incarnation of openSUSE, with support for 32-bit and 64-bit systems. openSUSE 11.3 is packed with new features and updates including SpiderOak to sync your files across the Internet for free, Rosegarden for free editing of your audio files, improved indexing with Tracker, and updates to Mozilla Firefox, and Thunderbird.

Among these many new features, openSUSE also provides support for netbooks and the Btrfs file system support. Users can expect to see improved hardware support with the 2.6.34 Linux kernel and updated graphics drivers. And support for the next generation of interactive computing for touchscreens like the HP TouchSmart.

openSUSE continues its tradition of delivering the popular KDE, GNOME and Xfce desktop environments, and now also provides the lightweight LXDE desktop environment. With GNOME, you can use the latest 2.30.1 version or take your installation for a drive with a preview of the upcoming GNOME 3.0. Or choose KDE SC 4.4.4 for the latest updates. They all feature the polish and integration that the openSUSE distro has been known for.

Click the desktop screenshots for a full view or see the complete collection of screenshots here.

GNOME Shell in GNOME 3.0

GNOME Shell in GNOME 3.0

Plasma Desktop on KDE SC 4.4.4

Plasma Desktop on KDE SC 4.4.4

For servers and development platforms, administrators can take full advantage of the new MariaDB and MySQL Cluster services as well as Conntrack to filter network packets for iptables. Developers will appreciate the plethora of tools available at their fingertips with GCC, GDB and Mono and IDEs such as Netbeans, Qt-Creator and many others. This is all on top of the countless libraries available through the openSUSE Build Service (OBS).

Visit our Product Highlights page for a detailed list of new features.

Source : news.opensuse.com
Tuesday, March 24, 2009

INSTALLING LINUX MINT 5 (ELYSSA) FOR DUAL BOOTING

a. Before the installation begin, create the 2 partition using partition magic, first partition use for linux native and the disk space used is about 5-10 GB and the file system type is EXT3
b. Second Partition use for Swap space.the disk space is 2 x Your Memory/RAM Capacity and the file system type is swap.

The minimum requirements can find at www.distrowatch.com

1. Boot from your LinuxMint 5 CD's

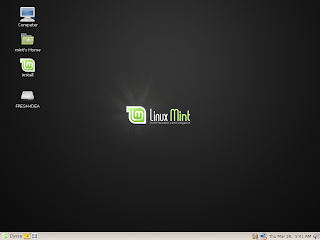
2. Click the install icon at the desktop, and the wizard will guide you during the installation


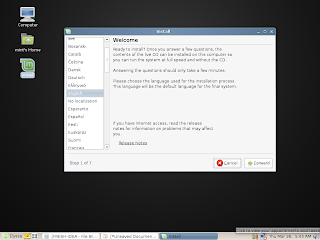
3. At the first step of the installation, we have to choose the languange that will we use during the installation process. Just choose the default option(English) and click forward to continue the installation


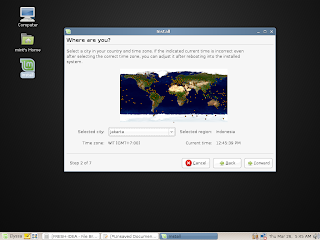
4. Then we need to setting the time zone, city where we live in. In this case I choose Jakarta, cause I live in Indonesia, click Forward to continue


5. The next step choose your keyboard layout, just left/passed it and click Forward to continue


6. Then the installer will setting up the partitioner

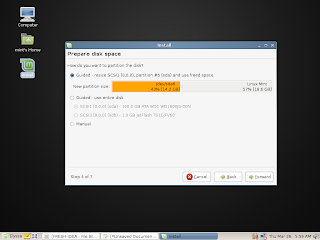
7. This step is the important step, so you must carefully. In this step we have to setup the disk space that will be used for installation. For the efficiency reason, choose "Manual" option and click Forward.


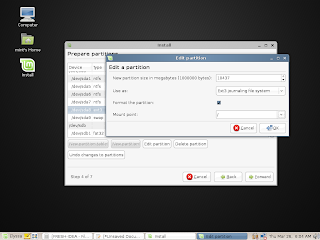
8. Choose free space disk that will be used, then click edit partition (Ex: /dev/sda8/ ). Check at "format the partition", at the "Mount Point" choose "/" cause we will use the partition as linux native (or the system).also do that for configuring SWAP partition, the different step just at "use as" you should choose "swap area". click OK to finish


9. Click Forward for begin partitioning the disk and installation

10. at the next step enter your login name, desktop name, and your password for login. Click Forward to finished the installation. Reboot the computer, remove CD from the tray. Enjoy Linux Mint and keep open source !!


Download full tutorial in pdf format :


Installing Netbeans 6.5.1 in LinuxMint 5 (Elyssa)

1. Before installing netbeans you sould installing jdk, jre, and other package first.Thend download netbeans 6.5.1 from http://www.netbeans.org
2. In assumption, we put it into /home/lambanx/Downloads directory
3. Run gnome terminal, give execute permission for the file by typing chmod +x netbeans-6.5.1-ml-linux.sh

lambanx@fresh-IDEA # sudo chmod +x netbeans-6.5.1-ml-linux.sh
[sudo] password for lambanx :


4. Run the netbeans installer by typing :

lambanx@fresh-IDEA # sudo sh /home/lambanx/Downloads/netbeans-6.5.1-ml-linux.sh
Configuring the installer...
Searching for JVM on the system...
Extracting installation data...
Running the installer wizard...

5. Follow the wizard

Wednesday, January 14, 2009

WGET - THE NON-INTERACTIVE NETWORK DOWNLOADER.

SYNTAX
wget [option]... [URL]...

DESCRIPTION
GNU Wget is a free utility for non-interactive download of files from the Web. It supports HTTP, HTTPS, and FTP protocols, as well as retrieval through HTTP proxies. Wget is non-interactive, meaning that it can work in the background,
while the user is not logged on. This allows you to start a retrieval and disconnect from the system, letting Wget finish the work. By contrast, most of the Web browsers require constant user’s presence, which can be a great hindrance when transferring a lot of data.

Wget can follow links in HTML and XHTML pages and create local versions of remote web sites, fully recreating the directory structure of the original site. This is sometimes referred to as ‘‘recursive download‐ ing.’’ While doing that, Wget respects the Robot Exclusion Standard (/robots.txt). Wget can be instructed to convert the links in dowloaded HTML files to the local files for offline viewing. Wget has been designed for robustness over slow or unstable network connections; if a download fails due to a network problem, it will keep retrying until the whole file has been retrieved. If the server supports regetting, it will instruct the server to continue the download from where it left off.

EXAMPLE
Usually we don't have enough time to download file from the internet that the capacity is too much big, we can use ( I usuallly too) wget to download file from the internet but it run at the background, so the download process would not directly disturb our activity. The syntax is like this :
lambanx@fresh-IDEA # wget -b [URL]

Example :

lambanx@fresh-IDEA # wget -b http://archive.ubuntu.com/ubuntu/pool/main/g/gfxboot/gfxboot_3.3.39-0ubuntu2_i386.deb


Automatically linux will write the download log file called wget-log, if there are some error during download process ,it will be write in this file. See the manual for complete option.

SETUP THE DEFAULT FILE PERMISSION

Sometimes, if we don't change the default permission in linux after we make a new file, that's can't be edited cause the file default perimission for the file is read only.I think it's not so comfort if each we make new file we should change the permission first if we want to edit that. We can use umask command to setup the default permission for the file that have been created/make. The Syntax is like this :
lambanx@fresh-IDEA # umask [permission]

Example :
I want to setting the default permission for the file that have been made to full access for user,group, and other
lambanx@fresh-IDEA # umask 777


the 7 number is represent full access permission for the file, why the there are three 7 number above? cause i would like to setting permission for user,group, and other.